Handsome 魔改教程:左侧边栏输出优化
感觉 handsome 自带的左侧边栏显示方法不太合适,于是自己参照了 UCW 大佬的教程 优化侧栏显示:实现更加美观的分类展示 改了一下。
修改方法
前置操作
建议引入 Font Awesome 图标库,在 主题后台设置 -> 开发者设置 -> 自定义输出 head 头部的 HTML 代码 里面添加下面的代码即可。
<link
  href="https://cdn.bootcss.com/font-awesome/4.7.0/css/font-awesome.min.css"
  rel="stylesheet"
/>
上面的 Font Awesome 的 css 文件来自 BootCDN 提供,你也可以替换成自己的文件。
改代码
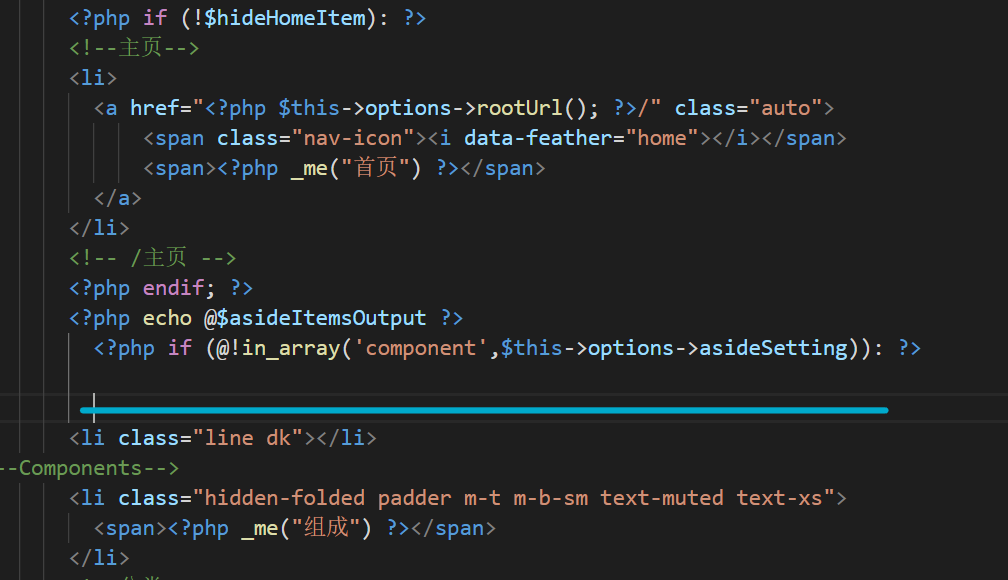
首先,打开 libs/Content.php ,在蓝线所示的位置:

插入下面的代码:
/**
 *
 * @param $categories
 * @return string
 */
public static function returnAsideCategories($categories){
    $html    = "";
    $options = mget();
    $icons   = array(
        'default' => 'glyphicon glyphicon-tasks',
        'github'  => 'fa fa-github'
        /**
         *  格式:  '分类缩略名' => '图标名称',
         */
    );
    while($categories->next()) {
        if ($categories->levels === 0) {
            $children = $categories->getAllChildren($categories->mid);
            if (!empty($children)) {
                $html .= '<li><a class="auto"><span class="pull-right text-muted"><i class="fontello icon-fw fontello-angle-right text"></i><i class="fontello icon-fw fontello-angle-down text-active"></i></span><span class="nav-icon"><i class="' . $icons[$categories->slug] . '"></i></span><span>' . $categories->name . '</span></a>';
                $childCategoryHtml =  '<ul class="nav nav-sub dk"><li class="nav-sub-header"><a><span>' . $categories->name . '</span></a></li>';
                foreach($children as $mid){
                    $child = $categories->getCategory($mid);
                    $childCategoryHtml .= '<li><a href="' . $child['permalink'] . '"><b class="badge pull-right">' . $child['count'] . '</b><i class="' . $icons[$child['slug']] . '"></i><span>' . $child['name'] . '</span></a></li>';
                }
                $childCategoryHtml .= '</ul>';
                $html .= $childCategoryHtml;
                $html .= "</li>";
            } else {
                $html .= '<li><a href="' . $categories->permalink . '" class="auto"><b class="badge pull-right">' . $categories->count . '</b><span class="nav-icon"><i class="'.$icons[$categories->slug].'"></i></span><span>' . $categories->name . '</span></a></li>';
            }
        }
    }
    return $html;
}
在 component/aside.php 中找到以下代码(大约 131 ~ 160 行),删除。
              <!--分类category-->
                <?php
                $class = "";
                    if (in_array("openCategory",$this->options->featuresetup)){
                        $class = "class=\\"active\\"";
                    }
                    ?>
              <li <?php echo $class; ?>>
                <a class="auto">
                  <span class="pull-right text-muted">
                    <i class="fontello icon-fw fontello-angle-right text"></i>
                    <i class="fontello icon-fw fontello-angle-down text-active"></i>
                  </span>
<!--                  <i class="glyphicon glyphicon-th"></i>-->
                    <span class="nav-icon"><i data-feather="grid"></i></span>

                    <span><?php _me("分类") ?></span>
                </a>
                <ul class="nav nav-sub dk">
                  <li class="nav-sub-header">
                    <a>
                      <span><?php _me("分类") ?></span>
                    </a>
                  </li>
                  <!--循环输出分类-->
                    <?php
                    $this->widget('Widget_Metas_Category_List')->to($categorys);
                    echo Content::returnCategories($categorys) ?>
                </ul>
              </li>
然后在下图蓝线所示的位置( 127 行左右 )
插入以下代码:
     <!--start-->
  <li class="line dk"></li>

<!--Components-->
  <li class="hidden-folded padder m-t m-b-sm text-muted text-xs">
    <span><?php _me("分类") ?></span>
  </li>
  <!--分类category-->
  <!--循环输出分类-->
  <?php
  $this->widget('Widget_Metas_Category_List')->to($categorys);
  echo Content::returnAsideCategories($categorys) ?>
  <!--end-->
然后,刷新你的博客,是不是就有效果了呢?
图标设置
设置方法:在 $icons 的 array 数组中插入 '分类缩略名' => '图标' 即可。
Font Awesome
如果你引入了 Font Awesome 的图标的话,可以到 https://fontawesome.dashgame.com/ 选择你喜欢的图标使用。
使用方法
在 https://fontawesome.dashgame.com/ 挑一个图标,在图标的名字前加入 fa fa- 即可。
使用样例
使用 archive 图标时:

对应在 $icons 的 array 数组中插入的代码:
'archives' => 'fa fa-archive'Fontello
handsome 主题自带部分 fontello 图标,具体列表可在 handsome 主题文档 查看。
使用方法
在图标的名字前加入 fontello fontello- 即可。
使用样例
与 Font Awesome 相似,在此不多赘述。
Feather
handsome 主题自带 feather 的所有图标,在此处使用需要一些变通措施。
使用方法
在 https://feathericons.com/ 选取好你需要的图标。
然后在名称前插入 " data-feather=" ,再输入名称即可。
使用样例
以 airplay 为例:
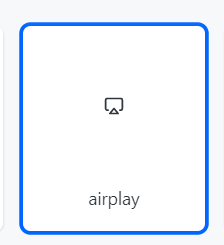
输入 'airplay' => '" data-feather="airplay' 即可。
其他 SVG 格式的图标
使用方法
在 svg 的开头加入 "></i> ,在结尾加入 <i 即可。
使用样例
下载下来的 svg 文件内容:

将其复制,然后在 $icons 的 array 数组中插入的代码:
'airplay' => '"></i><svg xmlns="http://www.w3.org/2000/svg" width="16" height="16" viewBox="0 0 24 24" fill="none" stroke="currentColor" stroke-width="2" stroke-linecap="round" stroke-linejoin="round" class="feather feather-airplay"><path d="M5 17H4a2 2 0 0 1-2-2V5a2 2 0 0 1 2-2h16a2 2 0 0 1 2 2v10a2 2 0 0 1-2 2h-1"/><polygon points="12 15 17 21 7 21 12 15"/></svg><i '后记
报错解决
报错 syntax error, unexpected 'xxx' (T_CONSTANT_ENCAPSED_STRING), expecting ')' 咋办?
检查你设置图标时的语法是否正确,正确语法如下:
$icons = array(
    'aaaaaaa'  => 'glyphicon glyphicon-xx',
    'bbbb'     => 'glyphicon glyphicon-xxxxxx',
    'cccccc'   => 'fa fa-xxxxx',
    'dddddddd' => 'fa fa-xxxx',
    'eeeee'    => 'glyphicon glyphicon-xxxx',
    'fff'      => 'fa fa-xxxxx'
)
注意
array函数的参数中除了最后一行,每一行末尾都有一个,